Idli

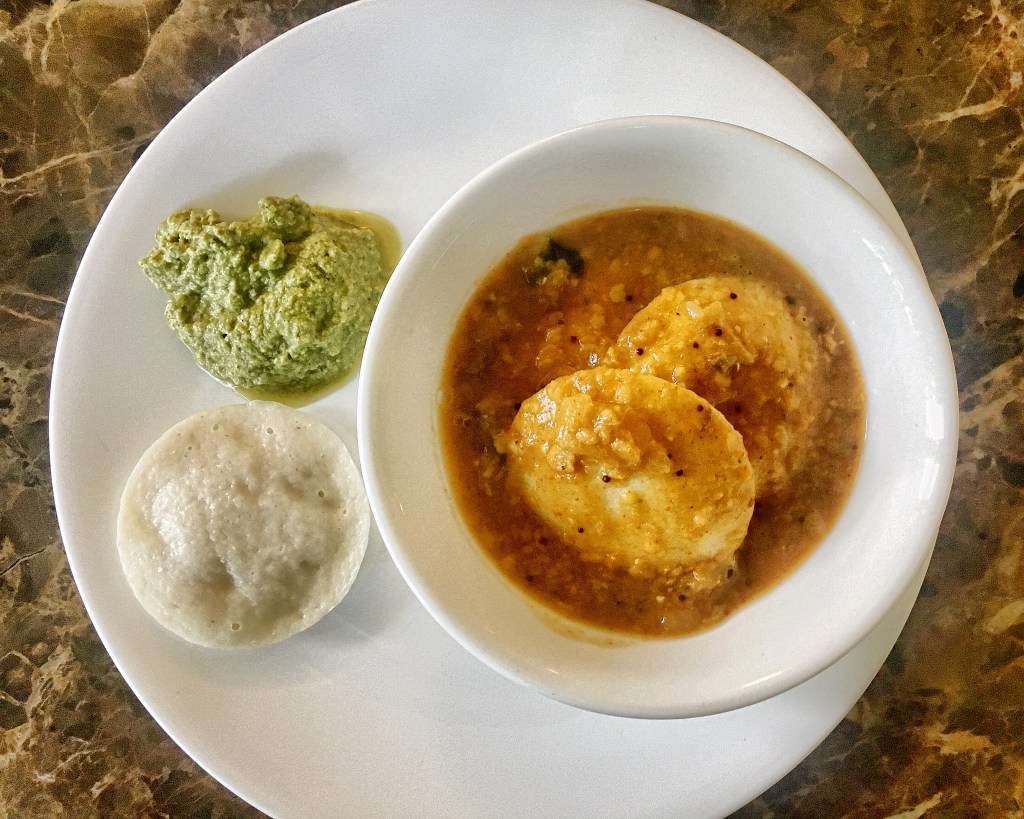
My favourite comfort food. Breakfast, lunch or dinner – I can eat idlies at any time. I make an idli batter almost every weekend for a leisurely breakfast followed by coffee.

IMG_2359

This recipe does not use cooking soda – I detest soda as it invariably makes me feel uncomfortable and bloated. The picture above was taken with the last remaining  idlies, sambar and chutney. Will try to replace this picture next week.

Using Idli rice might give you fluffier idlies but on most occasions I use the normal indrayani or kolam rice available at home. Use any rice – texture might differ but taste will rarely vary.

Ingredients

1/2 cup Split Urad dal (split black gram)
1 cup Rice
1/2 tbsp Methi seeds (Fenugreek seeds)
1 cup cold cold water
Salt, to taste

Procedure

  1. Wash the rice and dal thoroughly.
  2. Soak them separately (add the methi seeds to the dal) for at least 4-5 hours.
  3. After 4-5 hours drain and mix together. Grind them in a mixer/grinder adding 1 cup of cold water gradually. The final batter should be smooth, frothy and slightly coarse.
  4. Put the batter in a steel or ceramic bowl. Add salt and mix batter with your CLEAN hands. This will help fermentation.
  5. Cover the bowl (not airtight) and keep in a warm place for at least 10-12 hours until it ferments. Check for salt after it ferments and add more to taste.
  6. Take an idli steamer (a steamer with round idli moulds). Boil some water in the bottom half of the steamer.
  7. Grease the idli moulds with ghee and spread a little batter in each of them. Place the moulds in the steamer.
  8. Steam for 10-12 minutes. Remove the moulds and cool for a few minutes before serving hot idli with sambar and chutney.

I have a few wicked recipes for sambhar and chutney. That will be another day, another post. Until then get your idli batter ready. The process might sound daunting but it is actually quite simple and totally worthwhile. Readymade batters use preservatives and soda bicarb which I think are totally unnecessary and unhealthy.

I also add extra water to turn this into a dosa batter or I fry the extra idlies with onions, red chillies and curry leaves. There are times when kids love just idli fry (idli deep fried) or idli with sweet yoghurt (dahi idli).

To each his own


Pizza, homemade

I was at a film festival in Florence and that visit was food paradise! Pizza, pasta, risotto, sinful desserts, olive oil, fresh ingredients, minimum cooking and fantastic wine were my daily indulgences. I picked up hints of this pizza recipe from there and even began making pasta at home.

Enlight110

So here it is! Kids love pizza and so do we. Here is a recipe that uses minimum ingredients, is easily made at home and is much healthier than what we get delivered. The preparation time also doesn’t kill you.

For the pizza dough

Ingredients

3 cups wholewheat flour
1 tbsp Honey (I picked up the beautiful ‘Under The Mango Tree’ honey)
1 tbsp Active dry yeast
1 tsp Sugar
1-1/2 cups Lukewarm water
1 tsp Salt
1 tbsp Olive Oil

Procedure

  1. Put the yeast and sugar in the lukewarm water in a large bowl. Keep this aside for around 5-7 minutes.
  2. Add the honey, olive oil and salt. Mix. The yeast should have dissolved completely.
  3. Add the wholewheat flour. Mix and knead thoroughly for at least 5-6 minutes.
  4. Oil the bowl and rub the dough around in this.
  5. Cover with cling wrap (or just cover it) and keep in a warm place for at least 30-40 minutes. The dough will rise to nearly twice its size.

The Pizza Base

This is simple and does not require cooking. Best base is fresh base.

Ingredients

4-5 medium tomatoes diced
1 can tomatoes with paste or a pack of tomato puree
1 tbsp Dried oregano
2 tbsp Olive oil
4 cloves of garlic
1 tsp Red Chilli powder
1 tsp Black pepper, freshly gound
3-4 leaves of fresh basil (optional)
1 tsp salt (or more to taste)
1 tsp sugar/honey

Procedure

  1. Mix all the ingredients and pulse in a blender/mixer.
  2. This is the pizza base. Thats it!
  3. This base can refrigerated for at least 2-3 days.

Many people have their own pizza base recipes. Many Indian recipes involve cooking (and sometimes overcooking). I prefer the fresh sauce – it makes the pizza come alive.

Putting it all together

IMG_2339

  1. Pre-heat oven at 250-300 degrees.
  2. Dust a rolling surface with flour. Divide the dough into small balls and roll out into discs.
  3. Put the discs in the over for 5-7 minutes.
  4. Take the discs out.
  5. Spoon and spread the pizza base over the discs.
  6. Cut some fresh buffalo mozzarella (or packaged pizza cheese if you can’t find it close by) and spread over the base. I’ve also replaced mozzarella with lovely parmesan that I brought from Italy. The results were interesting.
  7. Top with each or a combination of – herbs, pepperoni, shredded and cooked chicken, salami, sausages, cooked prawns, capsicum, onion, mushrooms, paneer, cherry tomatoes or nothing at all. I prefer just simple herbs. Toppings can be combined based on individual tastes and can be a different creative pursuit.
  8. Put the discs back in the over for 3-5 minutes until you see the cheese melt and sizzle.
  9. Take the pizza out, top with fresh rocket leaves, blanched spinach, fresh herbs and some beautiful infused olive oil. Serve hot.
  10. (For adults) Pair with a good Chianti Classico or any good medium bodied red wine.

Last night I topped the pizzas with pepperoni and fresh herbs that my daughters grow in our kitchen garden. Yes, we have a kitchen garden in our Mumbai apartment where we grow chillies, basil, thyme, curry leaves, coriander, mint, tomatoes. And there was some fantastic new extra virgin olive oil that I’d picked up from a farmer in Florence.

Pizza is comfort food at its best and if made at home with fresh ingredients it need not be junk food! Try it…


Butter Chicken


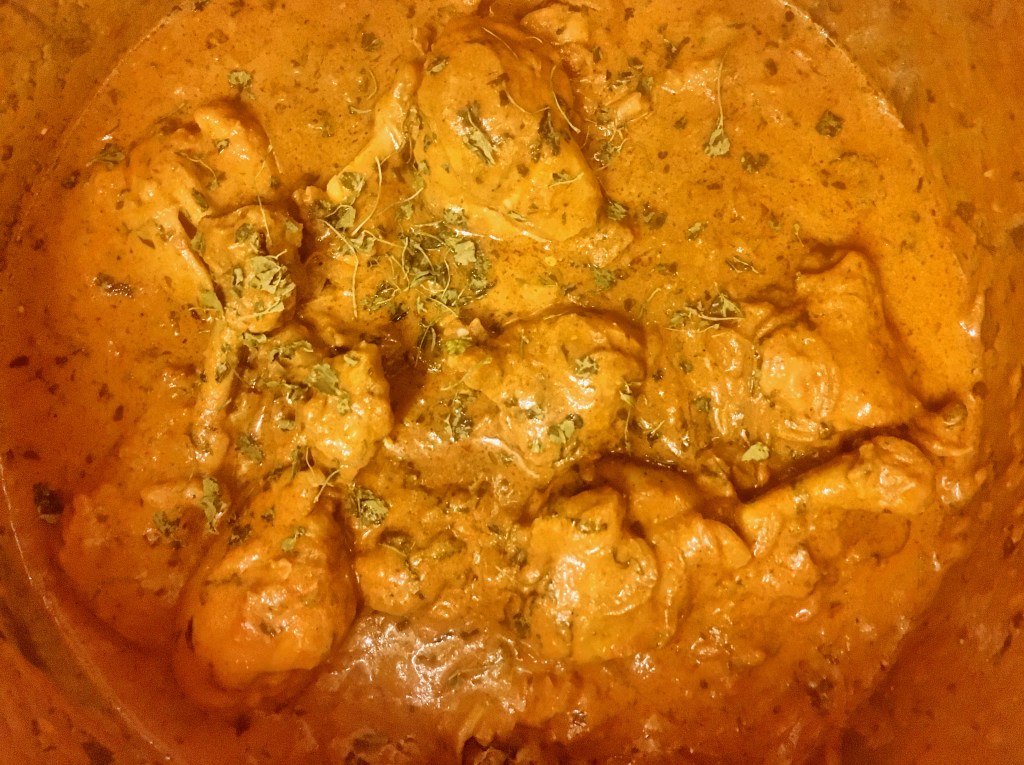
Here is a recipe that I’ve built after much experimentation. Every time I was cooking my kids would ask for Butter Chicken. This creamy, rich, mildly spicy, mildly sweet and yummy dish was often relegated to dining out and mostly inconsistent taste – every restaurant seemed to have its own recipe. Some recipes were legendary and SECRET. Some were ordinary – too creamy or too sweet. Some were downright awful – sweet, excessively creamy and usually very heavy on the stomach. Many recipe books gave you a recipe that would either take an eternity to cook or would be just terrible. Personally, I’ve found Butter Chicken overrated but nothing that my kids love so much can be overrated. It has to be recreated in my kitchen. And my kids must swear by my recipe! This is one such recipe. It is simple and it works like a dream. Here it is…

Ingredients

Marination
1 kg Chicken (with bone) or 750g Boneless – you choose
4 tbsp Ginger -Garlic paste
3 tbsp Red Chilli powder (vary depending on how spicy you want it)
3 tbsp Coriander powder (Dhaniya powder)
2 tsp Garam Masala powder
1 tsp Sugar (can be reduced)
1 cup Hung Curd or Greek Yoghurt
1-3/4 cups Tomato Puree
1/2 cup Fried Onions
1/2 cup Mint leaves, chopped
1/2 cup Coriander leaves, chopped
1 tbsp Kasuri Methi
Salt, to taste

To cook
3-4 tbsp Butter / Ghee or Oil
2 Cinnamon sticks  (dalchini)
4 Green Cardamoms (Chhoti Elaichi)
1 leaf Mace (Javitri)
1/4 cup Fresh Cream

Procedure

  1. Mix all ingredients for marinade together. Mix well and ideally keep refrigerated for at least 30 mins to 1 hour. Remove from refrigerator at least 20 mins before you begin cooking.
  2. In a deep pan heat the butter/ghee/oil and fry the Cinnamon, Cardamom and Mace for a couple of minutes.
  3. Add the marinated chicken. Bring to a boil. Cover and simmer for approximately 20-25 mins until the chicken is done.
  4. Take the pan off the heat and gradually add cream. Mix quickly so that it gets incorporated into the gravy and does not curdle.
  5. Bring the pan back to heat. Simmer for 5 minutes and let the chicken rest for another 5 minutes.
  6. Garnish with ginger juliennes and a little kasuri methi. Serve hot with roti, naan or plain rice.

And thats it!


Palak Chicken

palakchicken

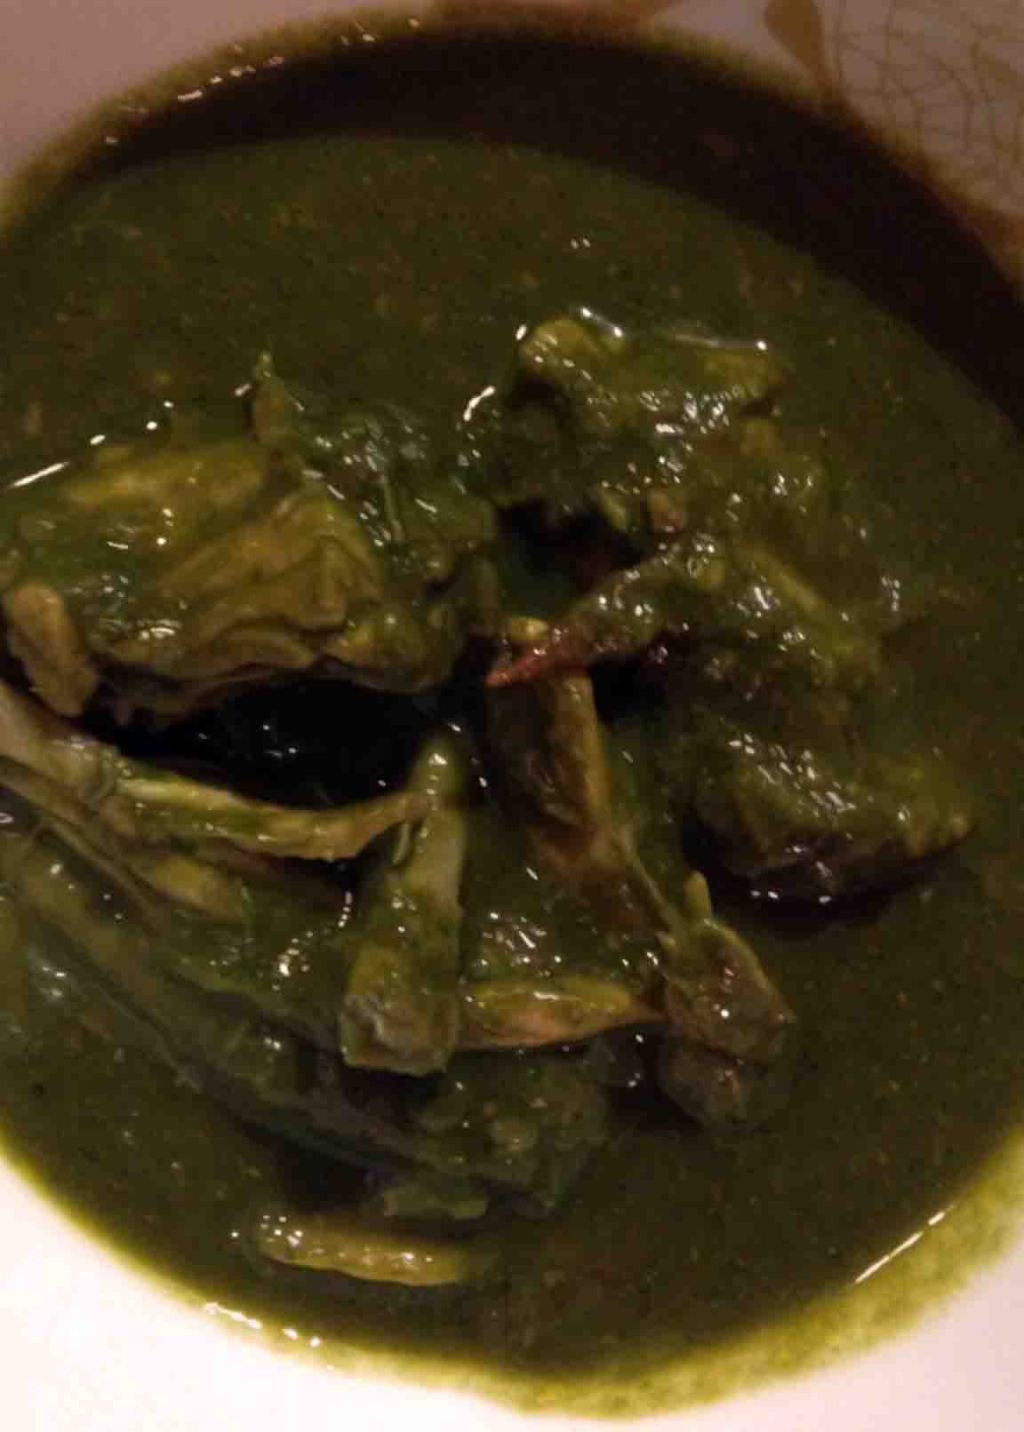
My wife loves spinach. So do I. Both of us love this simple yet delicious curry. I had surfed the net and my collection of cookbooks for a suitable recipe but found most either pale/dark colored or too greasy or just too convoluted. This recipe is my own concoction out of the many websites and books I referred to before embarking on my own exploration. I might not be a trained chef but now I can call myself an experienced adaptor of published recipes.

Ingredients

1.5 kg Chicken (medium pieces)
2 large bunches Spinach (palak), roughly chopped
3 medium onions, chopped
4 medium tomatoes, chopped3 tbsp ginger-garlic paste
2 sticks (1”) cinnamon (dalchini)
2 bay leaves (tej patta)
5 green cardamoms (chhoti elaichi)
2 tbsp oil or ghee
1 tsp red chilly powder (additional 1 tsp if you want it spicier)
2 tsp coriander powder
½ tsp turmeric powder
1 tsp garam masala powder
½ tsp dried fenugreek (kasuri methi)
salt, to taste

For tempering (tadka)

2 dried red chillies, halved
3 cloves garlic, chopped finely
1 tbsp oil

Procedure

  1. Put the spinach in boiling water for approximately 12-15 minutes (do not cover).
  2. Drain the spinach and reserve the water. Put the spinach in cold water and let it cool down completely.
  3. Puree the spinach or finely chop (I prefer to chop the spinach but my kids prefer the pureed spinach). Keep aside
  4. Heat the oil in a pressure cooker. Add the cinnamon sticks, bay leaves and green cardamom and cook until the begin to crackle.
  5. Now add onions and fry until they turn transparent.
  6. Add the ginger-garlic paste and fry for 5 minutes (until the raw smell disappears)
  7. Mix the red chilly powder, coriander powder, turmeric and salt in 3-4 tbsp water to make a fine paste. Add this paste to the pressure cooker and sauté for 3-4 minutes.
  8. Now add the chopped tomatoes and cook until the tomatoes are mashed.
  9. Add the chicken pieces and garma masala powder. Cook on high heat until the chicken pieces change color, their juices are sealed and the masala envelopes the pieces. This may take 3-5 minutes.
  10. Add ¼ cup (or less) of the reserved spinach water. (If you have drained the spinach water, just use plain water). Bring to a boil.
  11. Cover the pressure cooker, reduce flame to simmer. Let the chicken simmer under pressure for 8-10 minutes. Turn off the flame and wait until the pressure is released from the cooker.
  12. Open the lid of the pressure cooker and cook the chicken curry for another 5 minutes or until the gravy is reduced considerably.
  13. Now add the chopped or pureed spinach to the curry. Let it cook for approximately 5-7 minutes. Adjust the seasoning.
  14. Sprinkle kasuri methi and let it cook for another minute.
  15. Heat some oil in a pan. Add the chopped garlic and fry until it turns golden brown. Add the red chillies and let them fry for 2 minutes.
  16. Pour the tempering over the Palak Chicken gravy. Mix and cook for another minute.
  17. Serve hot with roti, naan or rice.

This recipe is simple, nutritious, satisfying and vibrant. My daughters who are usually averse to spinach now demand that I make Palak Chicken every time I am asked to cook a chicken dish. Add more red chilly powder and coriander powder if you like your curry spicy. I prefer my curry to be subtle and particularly light if it is being cooked for a weekday dinner.

Its been a long time since I shared recipes on the blog. There are many new recipes that I promise to share soon!

Lamb Chops Masala – Without a drop of oil!

I am battling with three issues : 1. Weight management  2. Withdrawal symptoms from quitting cigarettes and 3. Stress. To manage stress I usually cook. But this stress management method sometimes plays havoc with issues 1 and 2. Particularly when issue 2 plays havoc with issue 1. This is a recipe that partially dealt with all the issues.This is a recipe I adapted from two recipes that I read and tried with varying degrees of success. Most importantly, this is a healthy recipe that was a major hit with my guests! The recipe is simple, hassle free and very importantly has no added oil!

Image

Ingredients

24-25 Lamp Chops, cleaned
4 Medium Onions, chopped
4 Medium Tomatoes, chopped
1-1/2 cup Yoghurt
3 tbsp Garlic Paste
4 tbsp Ginger Paste
2 tsp Red Chili Powder
4 tsp Coriander Powder (Dhania powder)
4 tsp Cumin Powder (Jeera powder)
2 tsp Garam Masala Powder
Salt, to taste

For the garnish

Ginger juliennes
Lemon juice
Chopped Coriander (optional)
Garam Masala Powder

Procedure

  1. Clean and dry the lamp chops
  2. In a pan mix the lamb chops with all the ingredients except cumin powder, garam masala powder and the garnish.
  3. Place the pan on the gas and cook on high flame until the mixture comes to a boil.
  4. Cover and simmer until the lamb chops are half cooked. Add cumin powder and garam masala powder. Mix.
  5. Continue to simmer until the gravy thickens, envelopes the lamb chops. Cook until the lamb chops are fully cooked.
  6. Garnish with ginger juliennes and chopped coriander. Sprinkle lemon juice.

Serve hot with rotis/phoolkas/parathas or simply devour as a stand alone protein fest – without the guilt!

Spaghetti Bolognese – My Version!

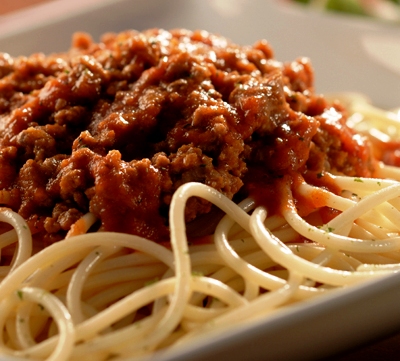
This is my version of the popular sauce (ragu alla Bolognese) that originated from Bolgna, Italy. Traditionally this is made with beef mince but my version uses lamb mince. The recipe is a variation of many recipes that I have tried earlier and it incorporates the best of both worlds – knowledge derived from expert chefs and my own unique ‘genius’!

Without further ado I present my version of a dish that is easy, delicious and a great prelude to a romantic night.


Ingredients

500gms Lamb mince

2 Medium Onions, finely chopped

6 Garlic Cloves, finely chopped

1 Glass of Red Wine (any decent, cheap red will do)

2 tbsp Balsamic Vinegar (optional)

½ tsp Dried Rosemary

¼ tsp Dried Thyme

1 tsp Dried Oregano

3-4 Fresh Basil leaves (optional)

8-10 Medium Tomatoes

2 Green tomatoes, chopped (optional)

Salt to taste Parmesan / Cheddar Cheese

Half a packet of spaghetti

2-3 tbsp Olive Oil

Procedure

  1. Boil water (approx 500 ml) and throw in the tomatoes. Let them boil until the skins begin to peel off. Remove the tomatoes from the water. De-skin the tomatoes and blend into a thick puree.
  2. Heat oil in a pan. Throw in the dried rosemary and thyme. Fry for around 1 minute or until slightly brown (do not burn)
  3. Add the chopped onions and garlic. Fry until they turn soft.
  4. Add the mince. Fry for another 4-5 minutes until it just changes color.
  5. Add the wine and balsamic vinegar. Cook on high flame until the gravy is reduced to nearly half.
  6. Add the tomato puree and chopped green tomatoes. Season with salt. Bring to a boil.
  7. Cover and let the sauce simmer for approximately 30-40 minutes or until the mince is cooked. This is your bolognese sauce – simmering gently waiting to be done and gently put over steaming spaghetti!
  8. Boil some more water in another pan. Add a teaspoon of olive oil and some salt to this. Cook the spaghetti in the boiling water as per the instructions on the pack.
  9. When the spaghetti is done, drain and keep aside. (Ensure that you do not make the spaghetti too early as it will dry up really fast)
  10. Tear the basil leaves and mix them into the bolgnese sauce.
  11. Make a bed of spaghetti on the serving plate. Put a generous amount of the bolgnese sauce on this.
  12. Generously sprinkle grated parmesan or cheddar cheese. Enjoy the meal!

I was so delighted with my recipe that I had my son make it the following night. It was successful. I polished off two glasses of good Indian wine in celebration of this wonderful dish. Dim the lights, serve this to your beloved in a nice white plate, with a glass of wine, soft candle-light and even softer music. A fresh salad on the side will be great but not essential.

Chicken Curry – Amritsar Style

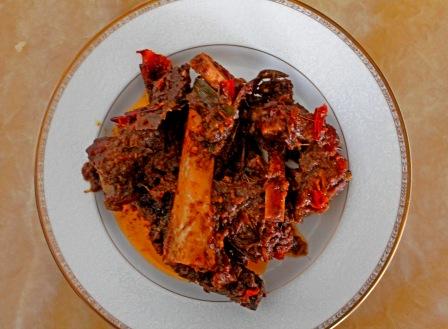
This is an amazingly simple recipe that I have adapted from an original mutton recipe. It is easy to make and is truly delicious. It tickles the palate and gets the digestive system really stimulated (in a good way!)

Ingredients

1 kg Chicken
12-15 Green Cardamoms (Elaichi)
2 Bay Leaves
5 Medium Onions, chopped
5 tsp Ginger-Garlic paste
3 Large Tomatoes, chopped
300 gms Yoghurt (Dahi), beaten
1.5 tsp Coriander Powder (Dhania Powder)
1.5 tsp Red Chilly Powder
1 tsp Dried Mango Powder (Amchoor)
1.5 tsp Garam Masala Powder
Bunch of fresh coriander (Hara Dhania)
4 tbsp Oil
Salt, to taste

Procedure

  1. Boil the chicken in approximately 1 litre of water with the cardamom and bay leaves.
  2. After 20 minutes reserve the stock, discard the cardamom and bay leaves. Keep the chicken pieces aside.
  3. Heat oil and add onions to this. Saute until golden brown.
  4. Add ginger-garlic paste and bhunao for 2 minutes.
  5. Add tomatoes and bhunao for 7 minutes.
  6. Add coriander and red chilly powders. Bhunao for 2-3 minutes.
  7. Add yoghurt and bhunao for 7 minutes.
  8. Add dry mango powder (amchoor), garam masala powder, chicken pieces and reserved stock. Bring to a boil.
  9. Cover and simmer until gravy is fairly thick (approx 20-30 minutes).
  10. Sprinkle fresh coriander. Cover and let the curry rest for 10 minutes.
  11. Serve with jeera rice, plain steamed rice or hot parathas.

A word about ‘Bhunao’ : This method implies continuous stir frying of masalas on high heat, stirring briskly and without diverting your attention to other insignificant worldly matters! It is a vital part of most Indian recipes – a method that gives the spices a slight ‘toasted’ flavor. It is also very simple, needs only your undivided attention and a strong hand!

Given the price of onions I feel a sense of guilt suggesting this but fresh chunks of onion, whole green chillies sprinkled with generous amounts of chaat masala, kashmiri chilly powder, chopped mint and lemon juice are a brilliant side to this dish.

I would love to have this with a glass of good chardonnay. But the doctor has asked me to stay off wine for a while as he suspects a wine allergy. So it’s just buttermilk for now!


Undhiyu – With Love to my Darling Mother!

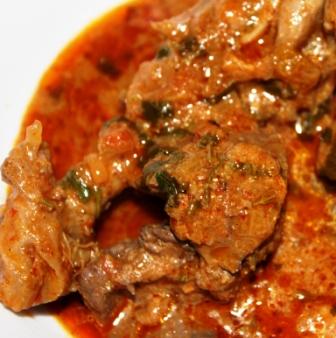
First it was my father-in-law’s closely guarded secret – Yusuf’s Kate Masale ka Gosht. This time it is my mother’s secret recipe that I have tried to re-create here. I cooked this for lunch and well, it came close to her brilliance!!! The missing ingredient was perhaps a mother’s love! This recipe is a tribute to the selfless caring and unconditional love that will need many lifetimes to partly reciprocate.

A ‘gujju’ favorite!

This is a recipe that is found in most gujarati thalis or gujarati weddings. The version here is much lighter and less sweeter than most gujarati homes. If you wish to replicate the sweet gujarati flavor add more oil and a greater quantity of sugar!

Flat Beans or Papdi

Some of the ingredients are usually seasonal (particularly the flat beans (papdi) and yam (kand). These can be replaced with a different variety of yam and similar beans. The authentic recipe also features fresh garlic (kachcha lehsun) but for the sake of convenience I have used regular garlic cloves. If you do find fresh garlic make sure you reduce the quantity as it can get very, very strong!

Yummy!!!

Ingredients 

½ kg Potatoes (Aloo), diced
½ kg Flat beans (Papdi), stringed and halved
2 Raw bananas , diced
100 gms Yam (Kand/Suran) , diced
3 Baby brinjals (Chote baingan) , diced into quarters
2 “ piece Ginger
4 cloves Garlic
4 Green chillies
1 tsp Turmeric powder (Haldi powder)
¼ cup Oil
Pinch of Asafoetida (Hing)
1 bunch Coriander leaves (Hara Dhaniya)
1 tsp Mustard seeds (Rai)
2 tsp Sugar or jaggery

For Muthiya:

¼ cup Bengal Gram Flour (Besan)
Small Bunch Fenugreek Leaves (Methi), chopped
½” Ginger, grated
1 tsp Red Chilli Powder
½ tsp Sugar
Oil to deep fry
Salt to taste

Procedure

  1. Make a rough paste of garlic, green chillies, ginger and half the coriander leaves.
  2. Mix all the muthiya ingredients except oil and prepare a firm dough.
  3. Divide the dough into small portions and shape each into rolls, and deep fry in hot oil. Remove and keep aside.
  4. Heat oil in a pan, add mustard seeds.
  5. When mustard seeds crackle mix in ground masala (step 1)  and all the vegetables except the beans. Mix well.
  6. Cover and cook this for around 5-7 minutes.
  7. Put the the beans in this. Add turmeric, asafoetida and salt. Stir fry for five minutes on high flame.
  8. Pour a cup of water, cover and simmer on a very low heat for 15-20 minutes or until the yam is totally cooked.
  9. Add the fried muthiyas and sugar/pounded jaggery. Simmer for 15 minutes shaking occasionally.

Serve hot with bajra ‘rotlas’ or phoolkas laced generously with hot ghee!

Chaas – The Pacifier!

 Cold Chaas (buttermilk) with freshly roasted, ground cumin and salt is a great accompaniment with this meal. To make it even more rustic take some fried green chillies and lumps of jaggery with this meal. It is recommended that you schedule a siesta after this meal as you are sure to feel drowsy after a sumptuous gujju meal!

Yusuf’s Kate Masale Ka Gosht

 My father-in-laws secret recipe revealed!

This is a recipe that my father-in-law Yusuf Husain has perfected. It is his secret recipe – one which he rarely shares with others! Even if he does share it you can be sure that he will leave out some important detail.   I have ‘cracked’ the recipe after many unsuccessful attempts and after much cajoling. It was cooked last night and everybody loved it. Yusuf saab approved of the preparation and finally welcomed me to the family secret!

Ingredients

1 kg Mutton / Lamb, big pieces
10-12 Medium Onions, thick slices
12 Garlic cloves,  roughly chopped
3 tbsp Ginger, chopped
2 Bay Leaves (tej patta)
5 Black Cardamoms (badi elaichi)
2  Cinnamon Sticks (dalchini)
15 Whole Black Pepper Corns (kali mirch)
12 Whole Dried Red Chillies
Salt, to taste
75 gms Yoghurt, beaten
4-5 tbsp Ghee or Oil

Procedure

  1. Heat ghee/oil in a saucepan. Take approximately half the quantity of onions and sauté until golden brown.
  2. Add mutton, bay leaves, black cardamoms, cinnamon sticks, pepper corns, red chillies and 1.5 tsp salt.
    Sauté on high flame until the meat changes color.
  3. Add garlic and ginger. Sauté for another 5 minutes.
  4. Add the remaining onions. Mix well and sauté for about 1 minute.
  5. Seal the vessel. Cook for approximately 45-50 minutes on low flame. In case you are using a pressure cooker, wait for 3 whistles and then let the meat rest while pressure is totally released from the cooker.
  6. Open the lid and you will see that onions are totally liquefied and the meat has been simmering in the liquefied onions.
  7. On medium heat sauté the meat until most of the liquid has evaporated.
  8. Reduce heat and add yoghurt. Mix well. Cover the vessel once again (not under pressure) and simmer for 5-10 minutes or until the meat is totally done.
  9. Let the meat rest for at least 15-20 minute before serving.

This is perhaps one of the most delicate, delicious and wholesome meat recipes I have come across. The cooking of meat in the onion gravy is the key to a successful result.

You can also follow the same recipe for Kate Masale Ka Chicken. With chicken you have to be careful that you do not overcook and that onions, ginger and garlic are chopped into smaller pieces to allow the onion gravy to form faster.

The red chillies and browning of the onions lend this dish its distinct reddish color. Excessive browning will make the dish very dark and some people prefer it that way.  You can add approximately 1 tbsp roasted and roughly pounded coriander seeds after adding the yoghurt. This adds a little extra bite but many people do not enjoy the distinct coriander flavor. Try it or give it a miss, but this is one recipe that you must try!

Enjoy this with rotis, naan or steamed rice. I prefer devouring this recipe without any of these!

Mirchi ka Salan – my style!

Ingredients

10 ‘Bhavnagri’  Green Chillies / Large Green Chillies, sliced or slit lengthwise
1/2 cup Peanuts
1 tsp Sesame seeds (Til)
1 tsp Cumin seeds (jeera)
2 tsp Coriander seeds (Dhania)
1/2 cup Grated coconut
2 Medium Onions, roughly sliced
3 tsp Ginger-Garlic paste
2 tsp Tamarind paste
1 cup Yoghurt 
5 tbsp Oil
Salt to taste
Water

Procedure

  1. Roast the sesame seeds, cumin seeds, coriander seeds and peanuts. Keep aside to cool.
  2. Take 1 tbs oil in a pan. Fry the sliced onions until they turn transparent. (Do not let them turn brown). Keep aside to cool.
  3. Blend the fried onions, grated coconut, roasted peanuts, sesame seeds, cumin seeds and coriander seeds to a paste. Add some water (approx 1/4 cup) to make the blending easier.
  4. Heat 2 tbsp oil in a pan. Fry the chillies for approx 4-5 minutes on a medium flame. Keep the chillies aside.
  5. In the same pan heat the remaining oil. Fry the blended masala paste with ginger-garlic paste and tamarind paste for approximately 4-5 minutes.
  6. Add the yoghurt to this and mix. Make sure the yoghurt is completely incorporated into the paste.
  7. Add the fried chillies to this. Mix and add 1 cup of water.
  8. Boil for 5-6 minutes. Turn off the heat and keep the pan covered for 5 minutes.
  9. Serve with paratha or rice.

I love the Bhavnagari chillies for their correct amount of ‘hotness’. You can use any other variety of green chillies. You can also de-seed them to make the chillies milder. The real fun though is in the salan. It is tangy, hot and delicious. Replace the chillies with eggplant and you have Baingan ka salan!

I am not sure about the authenticity of this recipe but I know that it is truly delicious. Try it!